The string in your weed eater could require replacement for one of two reasons. It might be empty or it may have perished during the winter months and has started to break off. Weed eater line has a shelf life and it is worth checking yours when you take it out of winter hibernation.
Replacing the string in your weed eater is not difficult, but for some reason, people fear the task. Some people prefer to use ready- wound reels in which case you just pop the new string in and get to work.
Here is our guide on the best weed eater heads and the best trimmer lines.
Below we’ve compiled an easy guide on how to string weed eater.
A Guide to Replacing Your Weed Eater Line
Step 1 – Start With the User Manual
Weed eaters are not all created equal. Some have a single line and others have dual lines.
The best place to start when stringing your weed eater is spending some time with the owner’s manual. There you’ll find information on the right size of the string specified for your trimmer.
If you can’t find the manual, try the internet. Sometimes the string size is contained on a label applied to the trimming head.
Step 2 – Choose the Right String Thickness
It is not a good idea to try to use anything other than the specified string as incorrect specifications will result in problems with your machine.
As a guideline, gas trimmers usually take 0.08 or 0.095, and electric whackers 0.065 and up.
These figures refer to the thickness of the string. Although you must choose the right thickness of your replacement string, you do still have options.
You can get a serrated, braided, round, or multi-sided line.
A round line is most commonly used, but some angled lines will handle the tough stuff more efficiently
Step 3 – Switch Off the Weed Eater
Before you do anything make sure that the string trimmer is turned off.
If the weed eater’s head is hot, allow it to cool. You don’t want to burn yourself.
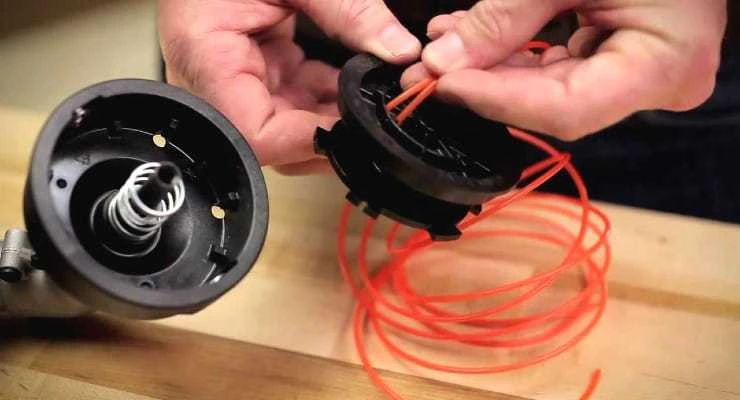
Step 4 – Remove the Spool
Lawn trimmer spools are also designed differently. With some weed eaters, you may have to remove the trimming head to get to the spool.
To do this you’ll have to remove the nuts and replace them once you have restrung your machine. With others, it is a lot easier. The spool should easily release from the retaining ring by means of a hand screw or pop out tabs.
If your weed trimmer uses two strings it will have a double spool with two sections each of which will contain the line for your weed wacker.
Step 5 – Remove the Old Line
Once you have the spool out, remove the existing spool, if there is any left, and throw it away. Clean any dirt and plant debris from the trimming head and spool.
Step 6 – Cut the String to Proper Length
The amount of string that you’ll need will depend upon what trimmer you have. Most machines will take between 10 and 25 feet. Don’t overfill the spool. You won’t get it back into place again.
Step 7 – Fill the Spool
Find the spool starter hole. Stick the end of the string into the small hole and wind the string onto the spool in the direction of the arrow.
You should find the arrow around the outer edge of the spool. Make sure to wind the string neatly from side to side to prevent problems later on. Don’t let the string overlap anywhere.
When you get to the last 6 inches of line, place it into the retainer on the spool. This will prevent the string from unraveling when you put the spool back.
If you have a double string trimmer, you’ll repeat the process with the second line. Make sure that the ends are equal.
Step 8 – Replace the Spool
Place the filled spool back into the trimmer head. Release the loose pieces from the retainer.
Feed it through the exit hole. Make sure that the lines can move freely. Replace the retainer ring.
Make sure it is properly in place you don’t want an accident when you start to trim your edges again. Trim the lines so that they are within the line limiter blade.
Frequently Asked Questions
How to Wind Weed Eater String?
Winding the weed whacker string properly will ensure that your string comes out true every time. First look for the arrow. It should be somewhere on the outer wall of the reel. Put the end of the string into the hole provided and then wind the string neatly in the direction of the arrow. If you can’t find the arrow on your spool, wind the string in the opposite direction to the motor spin. Make sure that you lead the string in single layers of straight rows to avoid tangles and uneven cuts later.
What is the Difference Between the Restring of a Single or Dual Line, Bump Head, and Automatic Feed Heads?
There are two types of electric feed trimmers – bump feed and automatic. The automatic feed automatically dispenses the string as needed. The bump feed dispenses the string when you bump it on the ground. This gives you more control over how many lines you use.
Trimmers may also differ in the string configuration. Some use a single string while others have a dual spool and two exit holes in the trimmer head. Both systems work equally well, and which you choose comes down to personal choice.
The Trimmer Line Keeps Coming Out – What to Do?
Weed trimmers have a little trimming blade that prevents the line from getting too long. If you have a problem with the line advancing too far out of the trimmer head there may be a problem with the blade and you need to consider replacing it.
The String Will Not Pull – What to Do?
If your weed eater string is failing to advance, there may be a problem with the spool. Switch the machine off and check inside the trimmer head. If it is empty, replace the string. Clean the ports and wipe off the spool and string. Some cheaper lines may weld together. If this is the case cut or replace the string. Check whether the string is twisted. If it is, rewind the spool.
